Builder User Manual - Synthreo
Builder user manual - complete reference for building AI agents, configuring nodes, managing workflows, and deploying automations with the Synthreo no-code Builder platform.
High-level idea
Section titled “High-level idea”Builder is an LLM-first, no-code AI platform to automate workflows and build new products with private or public large language models (LLMs) and a comprehensive set of other ML/non-ML tools.
-
No-Code workflow builder - Within our workflow builder, we simplify things for the user so that they do not have to dig into technical setups (enabled by our proprietary AI/ML intellectual property). It’s like the WIX.com for LLM workflow development.
-
Autonomous agents and powerful automation - Besides streamlined workflows designed to respond to data retrieval or creative tasks, users can also utilize autonomous agents that iterate on self-defined activities until they reach a user-specified goal.
-
Enterprise-grade quality - Features that help prevent hallucinations and ground models in factual data are at the center of our focus. Besides that, we are currently implementing features that will provide.
Platform structure
Section titled “Platform structure”A typical automation project needs four main ingredients: machine learning tools and non-ML instruments, data operations, orchestration to put everything together into a single cohesive project, and deployment options to deliver the project and allow end-users to use it. Builder platform delivers all four ingredients using these areas and features:
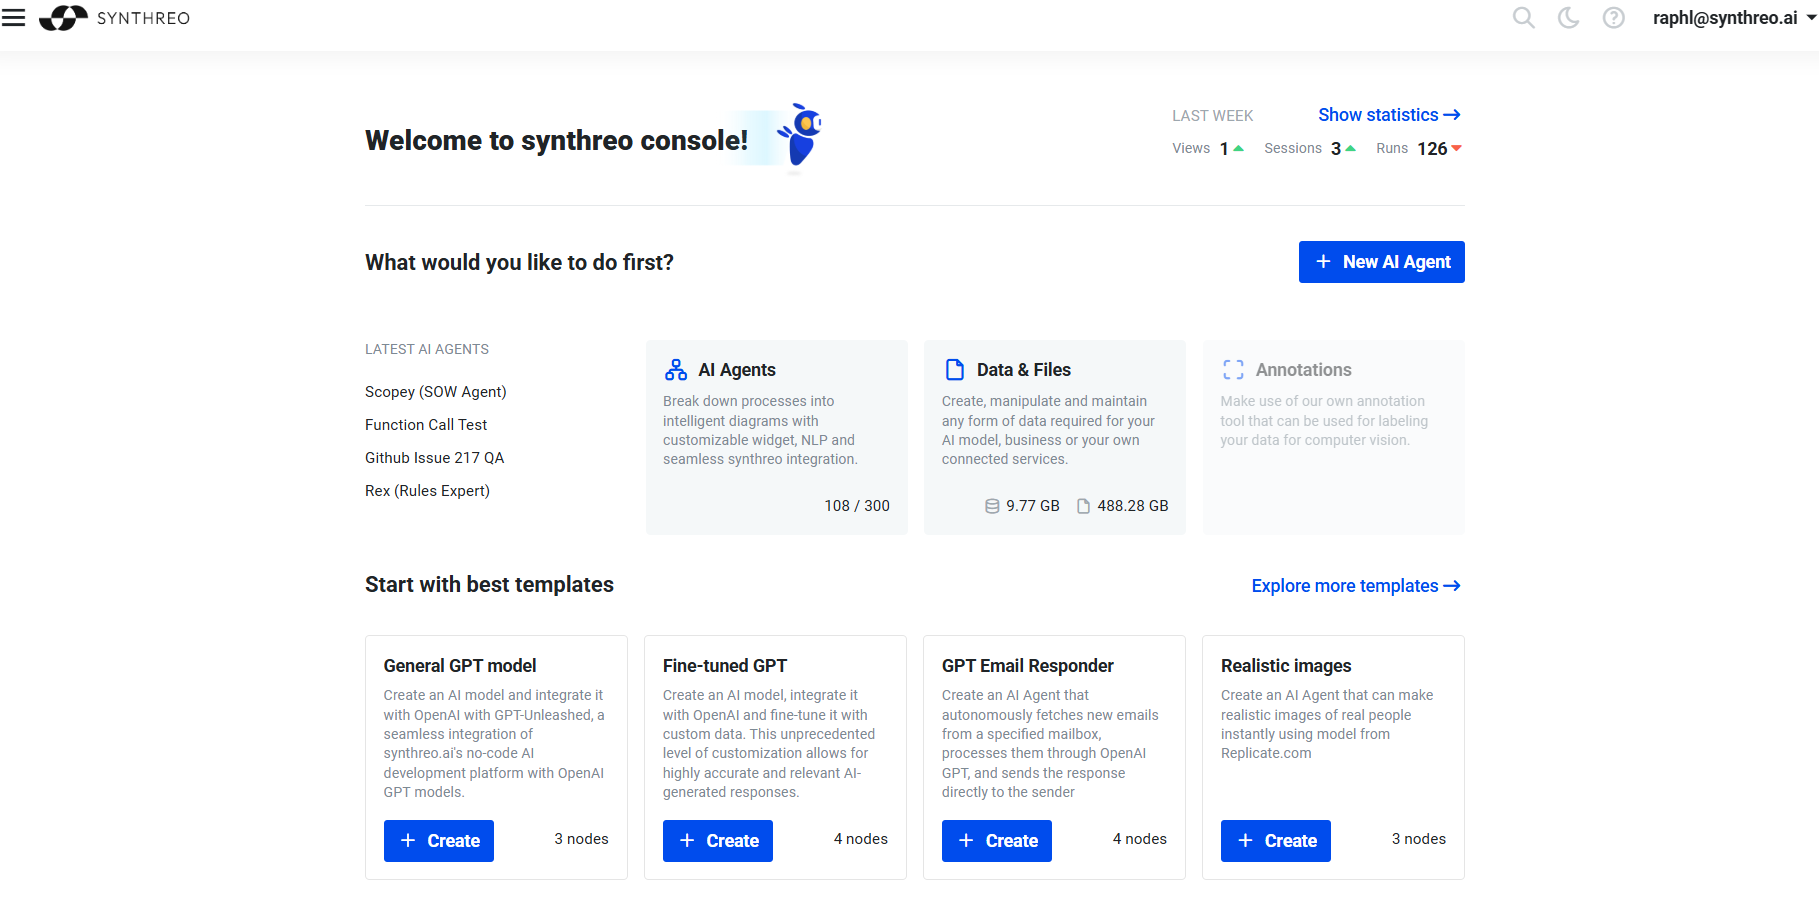
Dashboard
Section titled “Dashboard”The application’s landing page with basic statistics and easy access to the most recently created AI agents. Quick access to the main agendas (AI agents, Data system, Annotations). Create a new AI agent with one click or select ready-made solutions from selected templates.
AI Agent
Section titled “AI Agent”Covers the ML and non-ML tools and instruments and the orchestration part. This is our core technology where most of the magic happens. AI agent is designed in our no-code workflow builder, a diagram. The workflow builder naturally delivers the orchestration part as well because the builder of the AI agent allows the creation and connection of any number of nodes (each node is like a tool or feature).
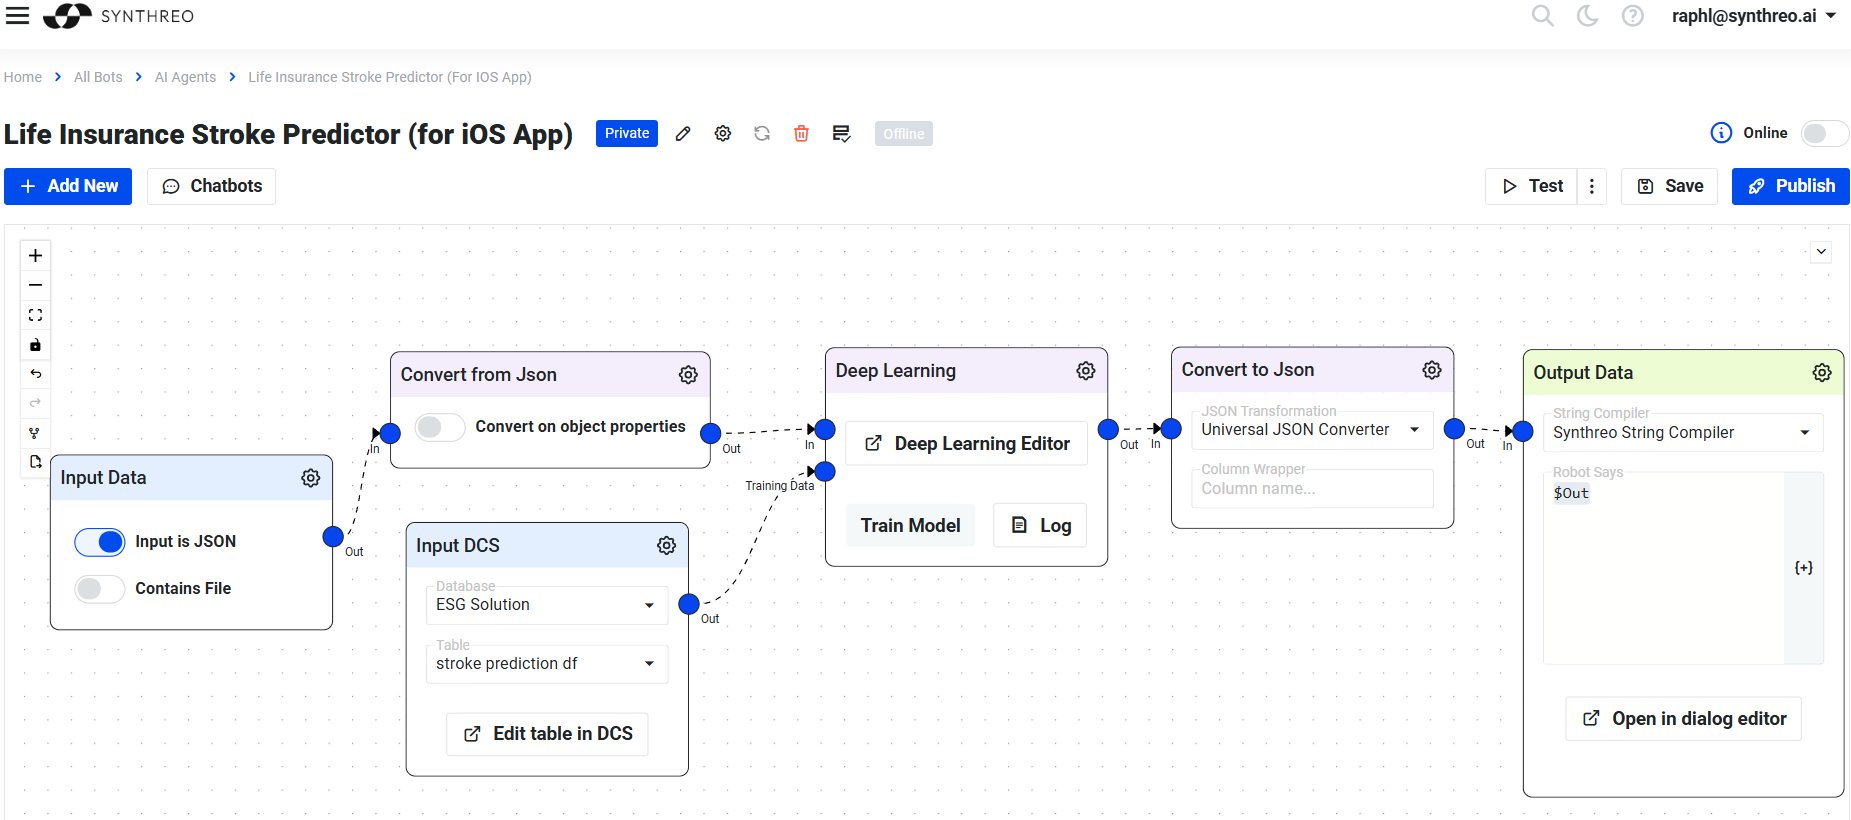
Builder’s Workspace
Section titled “Builder’s Workspace”The workspace is where users design and manage their AI agents. It provides a visual diagram-based interface where nodes are connected to form complete workflows. Each node represents a step in the process, and the overall layout defines how data flows from input to output.
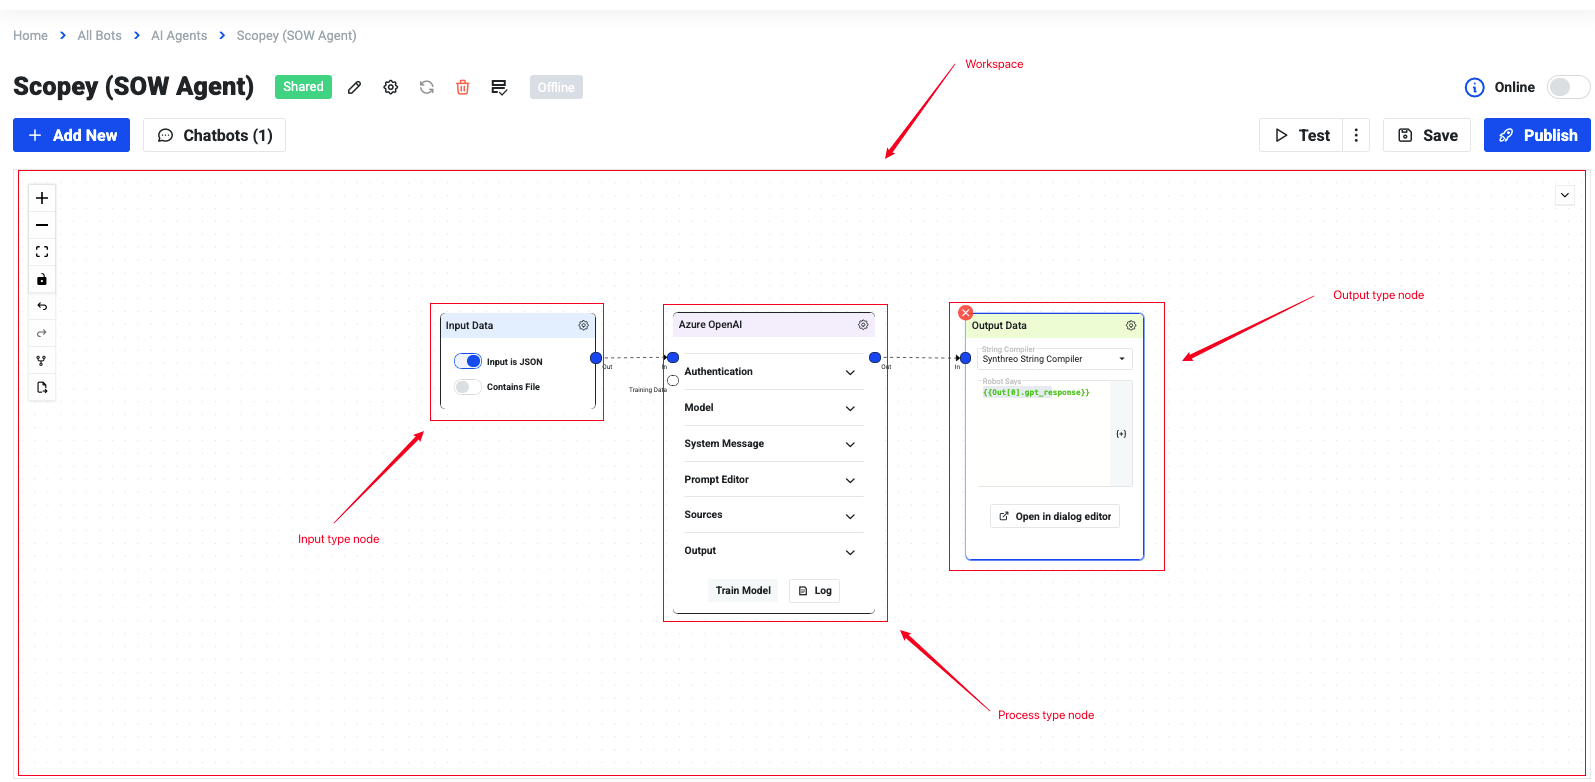
Node Types
Section titled “Node Types”To make building easier, Builder uses color-coded nodes that help users quickly identify their purpose:
- Input Nodes (Blue) - Define how data enters the workflow (e.g., user prompts).
- Process Nodes (Violet) - Represent transformations, logic, or AI operations performed on the input data.
- Output Nodes (Green) - Define the final results delivered to the user (e.g., generated text/response, insert record data to DCS).
Canvas Operations
Section titled “Canvas Operations”You interact with the canvas to build and modify your workflow:
- Adding a node - Open the node palette (the left sidebar or the add button on the canvas) and drag a node type onto the canvas, or click to place it.
- Connecting nodes - Hover over the output port of a node (the small dot on its right edge) and drag to the input port of the next node to draw an edge.
- Configuring a node - Click the cogwheel icon in the upper-right corner of any node to open its settings drawer or modal.
- Duplicating a node - Right-click a node and select the duplicate option to create a copy with the same settings, then reconnect as needed.
- Deleting a node or edge - Select the node or edge and press Delete, or right-click and choose the delete option.
- Panning and zooming - Use the scroll wheel to zoom and drag an empty area to pan. Fit-to-screen controls appear in the canvas toolbar.
- Repositioning nodes - Click and drag any node to move it to a new position on the canvas.
Exporting and Importing Flows
Section titled “Exporting and Importing Flows”You can export an agent’s flow as a JSON file and import it into another agent or environment. This is useful for backing up workflows, sharing configurations between teams, or moving agents between tenants.
- Export - From the agent canvas toolbar, use the export option to download the flow definition as a JSON file.
- Import - When creating or editing an agent, use the import option to upload a previously exported JSON file. After import, verify that credentials and node connections are correctly attached, as credential references do not transfer across tenants automatically.
Variables and Dependencies
Section titled “Variables and Dependencies”Each node can generate variables that subsequent nodes can use.
- Variables depend on the previous node’s output.
- For process nodes, open the node settings by clicking the cogwheel icon in the upper-right corner of the node. Then, use the Output dropdown to change the output name or its settings.
- Input nodes behave differently: their outputs depend on the type of input node. The specific outputs for each input type will be covered in their dedicated agent node wiki.
- This allows chaining logic, such as:
- Taking text from an input node → sending it to a process node (LLM or transformation) → returning the result in an output node.
Variable Syntax Reference
Section titled “Variable Syntax Reference”Builder uses a Mustache-inspired template syntax for referencing node outputs inside prompts, templates, and configuration fields.
| Syntax | What it resolves |
|---|---|
{{userSays}} | The user’s message from the Input Data node (shorthand, available globally) |
{{Out.nodeId}} | The full output object of the node whose Output Column Name is nodeId |
{{Out.nodeId.fieldName}} | A specific field within that output object |
{{{Out.nodeId.fieldName}}} | Triple braces - renders the value without HTML escaping, required for injecting HTML or Markdown |
Rules:
- Variable names are case-sensitive.
{{Out.gpt_response}}and{{Out.GPT_Response}}are different variables. - Each node’s Output Column Name must be unique across the entire workflow. Duplicate names cause conflicts.
- The
Out.prefix is required for all node outputs except the shorthand{{userSays}}(and Tool Eval outputs, which use{{outColumnName.paramName}}without theOut.prefix). - Stray
{{or}}characters in LLM responses can break downstream template rendering. If an LLM may produce curly braces in its output (for example, code blocks or JSON), inspect the raw output in the Debugger and consider sanitizing before passing to template-based nodes.
Workflow Starting Point
Section titled “Workflow Starting Point”In most cases, a workflow begins with an input node.
- The input node typically receives a JSON array object.
- One of the most common keys is
userSays, which contains the data passed into the agent (e.g., a user prompt from ThreoAI). - This input can then be transformed or passed to other nodes for processing.
Example Input Object:
[ { "userSays": "Generate a summary of the latest sales report" }]Agent Lifecycle and Flow Execution
Section titled “Agent Lifecycle and Flow Execution”When an agent is triggered (by a user message, a form submission, a scheduled run, or an API call), the engine executes the workflow from the starting node and follows edges forward. Key behaviors:
- Sequential execution - by default, nodes execute in the order defined by edges. The engine waits for each node to complete before moving to the next.
- Branching - when an LLM node uses tool-calling (function calling), the OpenAI Tool Eval node pattern allows the engine to route to different branches depending on which function the model chose. Each branch can be a different path through the canvas.
- Skipped nodes - if a branch condition is not met or a node has no incoming data, it may be skipped. The Output Data node’s Suppress Skipped Execution option ensures an output is still produced even when prior nodes were skipped.
- Parallel paths - some workflows have multiple paths that run independently and converge at a later node. In these cases, the engine may process branches in parallel.
- The Annotation node is the only node that is never executed - it is purely a documentation element on the canvas and does not participate in the data flow.
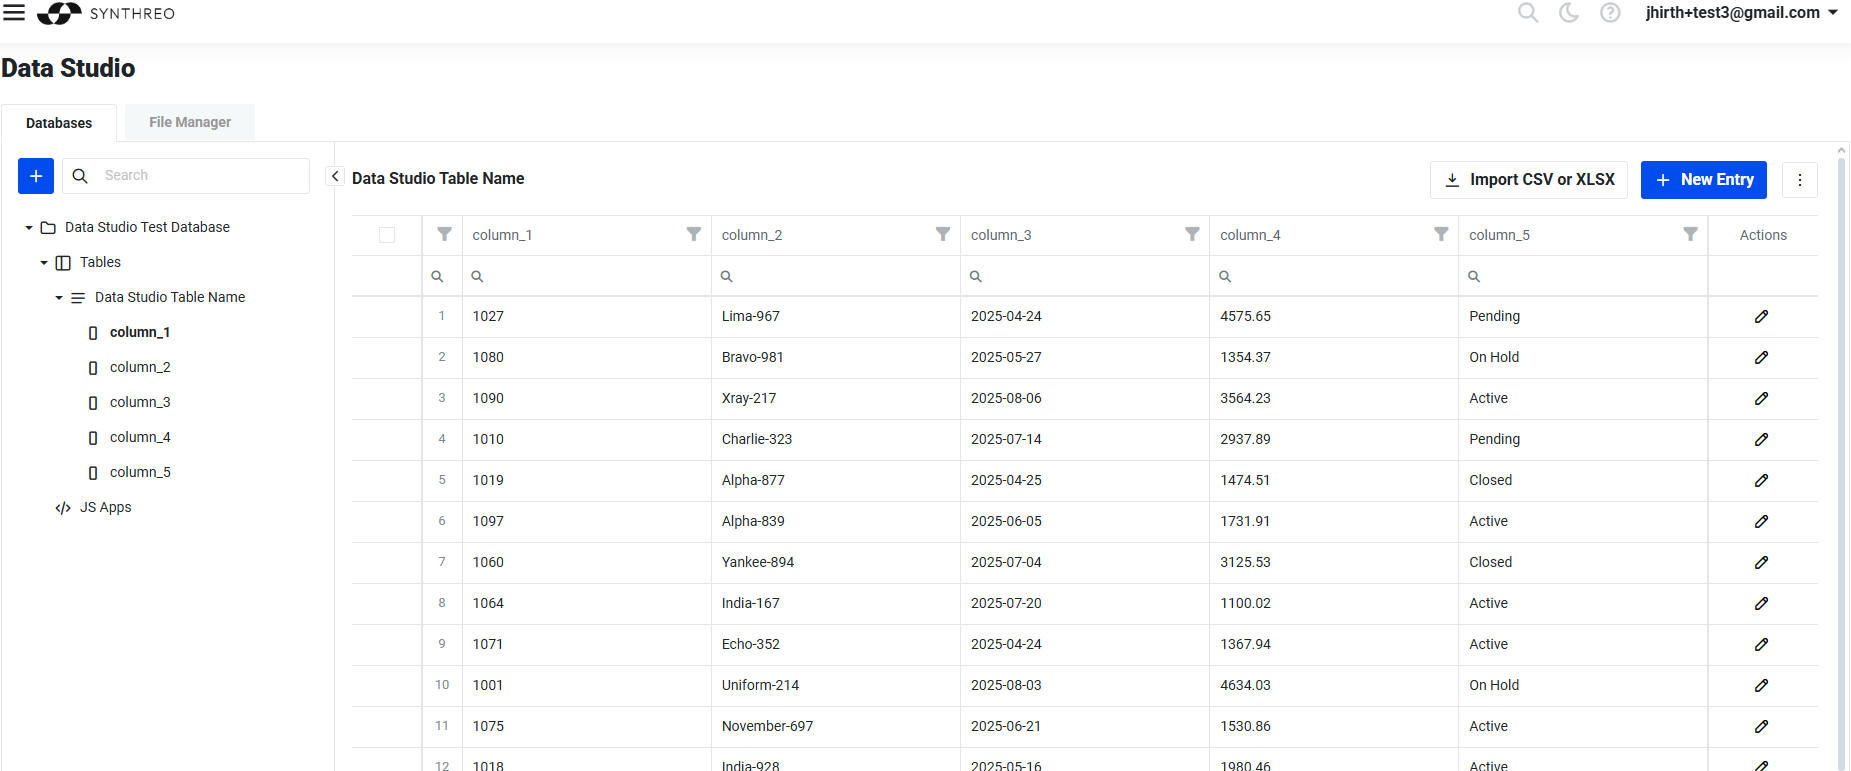
Data Studio
Section titled “Data Studio”Covers the data operations. It’s like database management in the cloud. We allow users to create a database, tables, and columns (DDL) and manipulate the data (DML). What makes Data Studio unique are the interactive features. When the user defines tables and columns and imports data, the Data Studio dynamically renders the GUI editors and screens to allow user-friendly creation, modification, and deletion of data. These dynamic GUI dialogs and forms can, however, contain custom user-defined GUI components, such as buttons, etc. Users can then define the actions of such buttons (for example, the button can call the AI agent with a currently opened data point). Effectively, this is a no-code approach to creating primitive apps. It’s great for implementing, testing, and showing a working prototype.
Annotations (coming soon)
Section titled “Annotations (coming soon)”Node Category Reference
Section titled “Node Category Reference”Builder’s node library is organized into categories. Each category contains nodes with a related purpose. The following sections describe each category and the nodes available within it.
Inputs and Outputs
Section titled “Inputs and Outputs”These nodes define where data enters and exits the workflow.
| Node | Purpose |
|---|---|
| Input Data | The starting point for most workflows. Receives user messages, JSON payloads, or file uploads and exposes them to downstream nodes via {{userSays}} or a custom output column name. |
| Output Data | The terminal node that formats and returns the workflow’s final result. Uses Mustache templates to render variables into the response string. Supports {{Out.variable}} (escaped) and {{{Out.variable}}} (unescaped HTML). |
| File Loader | Loads a file from a path or URL and passes its contents into the workflow. |
| Input DCS | Reads data from a Data Studio table and injects it as structured input. |
| Save to File | Writes data from the workflow to a file on the server filesystem. |
The Input Data node is the entry point for conversational and form-driven workflows. Its key settings are:
- Input is JSON - enable when the agent receives a structured JSON payload (from a scheduled trigger or another agent call) rather than a plain text chat message.
- Contains File - enable when the user may upload a file. The file arrives as Base64-encoded data, accessible via
{{base64file}}by default. - Output Column Name - controls the variable name (
{{userSays}}is the default) used to reference this node’s output downstream.
The Output Data node collects the workflow’s final data and renders it using the Synthreo String Compiler template engine. Reference upstream variables using {{Out.variable_name}} for escaped output or {{{Out.variable_name}}} for unescaped HTML. During prototyping, set the template to {{Out.gpt_response}} to inspect the full LLM output, then narrow to specific fields once you know the response shape.
LLM Nodes
Section titled “LLM Nodes”LLM nodes connect to language model providers and are the primary processing engines in most workflows.
| Node | Purpose |
|---|---|
| LLM node (unified, repositoryId 1087) | The recommended node for all new workflows. Supports OpenAI, Azure OpenAI, Anthropic Claude, Google Gemini, and other providers through a single interface. Configure the provider and model in the node settings. |
| OpenAI GPT | Legacy node for OpenAI and Azure OpenAI. Being deprecated in favor of the unified LLM node. Existing workflows continue to function. |
| OpenAI Tool Eval | Companion to the OpenAI GPT (or LLM) node when using function calling. Captures the parameters from a specific named function call and exposes them to downstream nodes. Each Tool Eval node matches exactly one function name. |
The unified LLM node (repositoryId 1087) is the primary LLM integration point for all new agents. It consolidates all vendor configurations into one node and is the recommended choice going forward. The legacy OpenAI GPT and Azure OpenAI nodes remain functional for existing workflows but new agents should use the unified LLM node.
Key LLM node settings:
- System Message - sets the role and behavioral instructions for the model. This is the most important prompt configuration.
- Prompt Editor - the user-turn input, typically containing
{{userSays}}or other dynamic content from upstream nodes. - Pass on Previous Messages - when enabled, conversation history is carried forward so the model has context across multiple turns. Enable for chatbot-style agents; leave off for stateless one-shot processing.
- Model Parameters - temperature, max tokens, and response format (
TextorJSON Object). - RAG Training Settings - training style (Questions & Answers or Text Documents), embedding model, and training mode. Used when the node has a knowledge base attached.
- RAG Inference Settings - distance function, minimum confidence threshold, and Top N contexts. These parameters control which knowledge base chunks are retrieved and injected into the prompt at inference time.
- Output - defines the output column name (default:
gpt_response). Enable Omit Full Response to suppress the large raw response object; disable Omit when passing the response to a Tool Eval node (the tool call data lives in the full response).
Tool Eval pattern for branching workflows:
When you want the LLM to choose between multiple actions, define tool schemas in the LLM node’s Tools section, disable Omit on the Output, then add one Tool Eval node per function. Each Tool Eval node:
- Has a Match Function Name matching one of the tool schema names.
- Has a Full Response Property Name pointing to the LLM node’s output column.
- Has a unique Output Column Name whose fields are referenced downstream as
{{outColumnName.paramName}}(noOut.prefix).
This lets the engine route to different downstream branches depending on which function the model selected.
Transformations
Section titled “Transformations”These nodes convert, reshape, or process data as it flows through the workflow.
| Node | Purpose |
|---|---|
| Convert From JSON | Parses a JSON string and converts it to a stringified Python dictionary. Use when a downstream node or script requires Python-style dict syntax rather than raw JSON. |
| Convert To JSON | Serializes a Python object or structured data to a JSON string. |
| Convert File to Base64 | Encodes a binary file as a Base64 string for transmission or storage. |
| Convert Base64 to File | Decodes a Base64 string back to a binary file. |
| File to Text | Extracts plain text content from uploaded files (PDF, DOCX, and similar formats). |
| String Ops | Performs string manipulation operations (trimming, splitting, replacing, and similar). |
| Transform | Applies data transformation logic to reshape a payload from one structure to another. |
Online Operations
Section titled “Online Operations”These nodes interact with external systems and services.
| Node | Purpose |
|---|---|
| HTTP Client | Makes HTTP requests (GET, POST, PUT, DELETE) to external REST APIs. Supports custom headers, body, and authentication. |
| Send Email | Sends an email using either the platform’s default mail service or a custom SMTP configuration. Supports dynamic To, CC, Subject, and Body fields with variable substitution. |
| Send SMS | Sends an SMS message to a phone number. |
| Web Search | Performs a web search and returns results as structured data. |
| URL Scraper | Fetches and extracts content from a web page. |
| OCR | Performs optical character recognition on an image or PDF and returns the extracted text. |
| Email Receiver | Configures the agent to be triggered by incoming email. |
The Send Email node is a common output step for notification and escalation workflows. Its Body field accepts HTML and variable references ({{customerName}}, {{Out.gpt_response}}). For better email deliverability, configure a custom SMTP server with SPF and DKIM authentication using your business domain rather than relying on the platform default.
Data Flow
Section titled “Data Flow”| Node | Purpose |
|---|---|
| Information Search | Searches through data from previous nodes using exact or similarity-based matching. Useful for finding records, validating inputs, or filtering datasets. Supports configurable similarity distance and word-based matching. |
| Update Database | Writes or updates records in a connected Data Studio table. |
| Value Exists | Checks whether a variable or field is present and non-empty, enabling conditional branching. |
Utilities
Section titled “Utilities”| Node | Purpose |
|---|---|
| Custom Script | Executes custom Python code inline within the workflow. Receives input_json and meta parameters, must define an execute function, and must return a JSON-serializable object wrapped in a unique key. Supports optional script encryption. |
| Annotation | Places a text note on the canvas. Does not execute, does not connect to other nodes, and has no effect on workflow behavior. Use it to document logic, label sections, and leave instructions for collaborators. |
| Regex | Applies a regular expression to a string and returns matches. |
| Wait | Introduces a configurable delay before the next node executes. |
| Value Exists | Checks for the presence of a value; may also appear in the Data Flow category. |
The Custom Script node is the most flexible utility node. It runs arbitrary Python inside the workflow engine. Every script must follow this contract:
def execute(input_json, meta): # input_json: data from the previous node # meta: workflow context metadata result = { "custom_result": { "processed": True, "score": 95 } } return resultThe return value must be wrapped in a unique top-level key (such as "custom_result") to prevent collisions with other node outputs. Reference the result downstream as {{Out.custom_result.score}}.
| Node | Purpose |
|---|---|
| Sentiment Analysis | Classifies the sentiment of a text input (positive, negative, neutral). |
| Feature Extraction | Extracts key features, topics, or entities from text. |
| Similarity | Computes a similarity score between two text inputs. |
Machine Learning
Section titled “Machine Learning”| Node | Purpose |
|---|---|
| Deep Learning | Applies a deep learning model to the input data. |
| Prepared Model | Runs inference using a pre-configured ML model stored in the platform. |
Integrations
Section titled “Integrations”| Node | Purpose |
|---|---|
| CRUD Integration | Connects to an external data source and performs create, read, update, or delete operations. |
| Office 365 | Integrates with Microsoft Office 365 services (mail, calendar, files). |
| LangChain | Executes a LangChain chain or agent within the workflow. |
| Replicate | Calls a model hosted on Replicate.com. |
Building a Basic Workflow
Section titled “Building a Basic Workflow”The simplest complete workflow consists of three nodes: Input Data, an LLM node, and Output Data.
- Place an Input Data node on the canvas. Leave the output column name as
userSays. - Place a LLM node (or OpenAI GPT node) and connect the Input Data output to it. In the node settings, write a System Message that describes what the agent does. In the Prompt Editor, reference
{{userSays}}so the user’s message is passed to the model. - Place an Output Data node and connect the LLM node to it. In the data template, type
{{Out.gpt_response}}to render the model’s response. - Save the workflow and click Test to run a test execution. Enter a sample message and inspect the result.
This three-node chain is the foundation for more complex workflows. Add intermediate nodes between the LLM and Output Data nodes to transform, filter, or enrich the response.
Related Documentation
Section titled “Related Documentation”- Welcome to Builder - platform overview and getting started path
- Form Builder - attach structured input forms to agents
- Builder Debugger - inspect per-node execution and diagnose issues
- RAG Best Practices - knowledge base training and retrieval tuning